Facing a damaged module? This short guide gives straightforward steps to get your system back to full function. Our friendly team at SolarMedix.com has served New York and New Jersey for over 19 years and finished nearly 6,000 projects in the area.
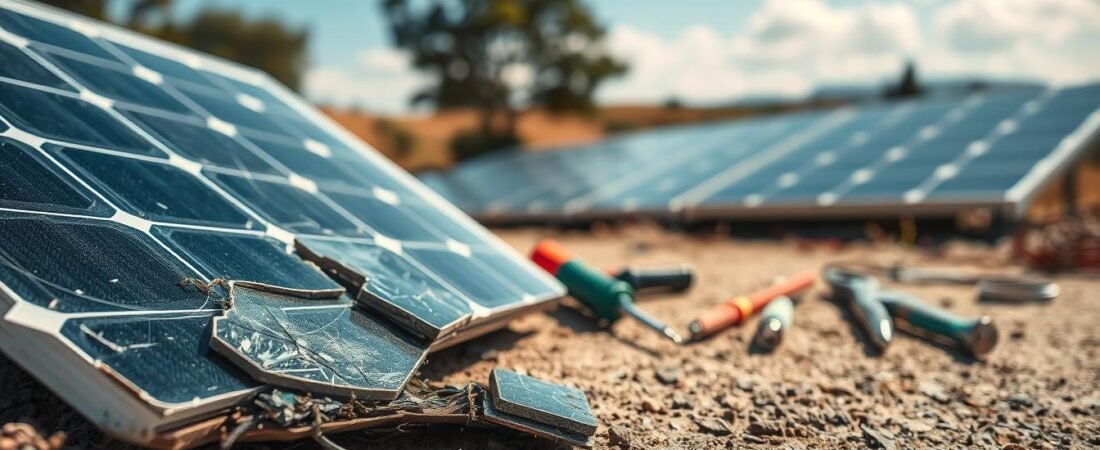
Panels are tough, but weather, debris, or impact can cause cracks and moisture that hurt output. Spotting a cracked surface early helps avoid a costly replacement and keeps your home safe.
What to do first: stop using affected sections, document the damage, and call experienced technicians. Proper maintenance and quick action prevent small problems from spreading across your array.
Read on for easy checks and safe steps that protect your investment and restore reliable energy production.
Identifying Signs of Solar Panel Damage
A close inspection helps spot wear that cuts into system output over time. Start with a simple routine check and combine what you see with performance data to get a clear picture of any trouble.
Visual Inspection
Look for visible fractures, chips, or debris on the glass surface. Tempered glass is tough, but repeated hail or impact over many years can cause panel glass fractures.
Quick checklist:
- Check for hairline cracks or shattered areas on the glass.
- Watch for dirt, bird droppings, or leaves that may trap moisture.
- Note any flashing lights on inverters — that can signal a safety problem.
Performance Monitoring
Microcracks often hide from the naked eye but show up as lost production. Track daily energy and efficiency numbers to spot sudden drops.
- The NREL tested 3,000 modules after a hailstorm and found only one with damage, so modern panels hold up well.
- If output falls and troubleshooting rules out wiring, suspect the cells or panel glass layer letting moisture in.
Common Causes of Solar System Fractures
Every system faces stresses that slowly weaken glass and cells over years of sun and weather.
Thermal cycling is a primary culprit. Daytime heat expands materials and night cooling makes them contract. This repeated motion creates tiny microcracks that grow over time.
High-speed winds also stress roof-mounted systems. Gusts can twist or bend frames and put pressure on mounts, which may lead to visible cracks or internal fractures.
Other common issues include poor installation on uneven roofs and panels set at awkward angles. These force constant bending and raise the chance of long-term structural failure.
- Hail and repeated impacts weaken the glass until deep cracks form.
- Unsecured modules can shift in transport or storms and harm cells beyond simple fixes.
- Microcracks, often invisible to the naked eye, will reduce energy production as they spread.
For more on how panel glass fractures occur, see this report on panel glass fractures.
Effective Methods for Broken Solar Panel Repair
A few careful fixes can keep a cracked surface from letting moisture into the electrical parts.
Two low-cost methods commonly extend module life and block threats that reduce output. Both focus on sealing and stabilizing the glass so internal cells stay dry.
Applying Laminate Film
Transparent laminate film creates a waterproof barrier over the glass. It keeps moisture and dirt out and keeps small cracks from widening.
Use a squeegee to remove bubbles and make sure the film bonds flat to the surface. Clean the glass thoroughly before application for best adhesion.
Using Polyurethane Sealants
Polyurethane is a quick-curing adhesive that fills fissures and stops glass from flaking off. It is affordable and easy to apply for minor damage.
Leave the sealant to cure for 24 hours to protect electricity output. When used correctly, these methods help panels repaired with them stay productive and safe.
- Laminate prevents moisture penetration and shields cracked glass.
- Polyurethane fuses edges and protects against environmental threats.
- Always clean the surface first and follow cure times for full benefit.
When to Choose Replacement Over Repair
Sometimes replacing a whole unit saves time and money compared with patching the top layer.
Replace the solar panel if shards of glass are flaking off or fractures run across most cells. Once the protective glass fails, moisture and dirt can quickly harm the rest of the module.
Severe hail or impact damage that scatters cracks usually calls for full replacement. In many cases this restores long-term efficiency and production faster than repeated fixes.
- If cracks disperse sunlight and lower output, replacement preserves overall system performance.
- Microcracking across many cells can compromise the entire solar system beyond cost-effective repair.
- Insurance often covers replacement for weather or vandalism, easing the financial burden.
- Replacing individual parts is possible, but labor and installation complexity often make full replacement wiser.
When in doubt, choose safety and reliability. If a unit no longer produces at a high level, a timely replacement protects your renewable energy investment and restores efficient operation under the sun.
Proactive Maintenance to Prevent Future Damage
A few easy habits can keep your rooftop array running near peak efficiency. Routine care reduces the chance of microcracks, moisture ingress, and loss of production.
Routine Cleaning and Inspection
Keep glass clear. Periodic rinses with a hose and a soft brush remove dirt that stresses the cells and lowers efficiency.
Trim trees so branches don’t shade or fall on your system. Clear bird nests and debris quickly to stop moisture buildup that can cause cracks.
- Inspect mounts and frames after high winds or hail to spot early signs of panels damage.
- Schedule regular checks to catch microcracks before they worsen and require panels repaired by a pro.
- Consider a long-term plan: Airis Energy’s 20-year maintenance agreement includes service dispatched within 72 hours for any panel issues.
Proactive steps today keep glass and cells working for years and protect overall production. For full maintenance options see our guide on preventative and reactive maintenance.
Conclusion
Small faults often stay small when you catch them early and get professional help.
Addressing a broken solar panel quickly is key to home safety and steady output. Whether you opt for a quick laminate fix or full replacement, trained technicians protect performance and limit future problems.
Proactive care prevents cracked solar glass and cell damage. Regular inspections and prompt service keep panels and modules working longer and guard your renewable energy investment.
Questions or need a quote? Call SolarMedix.com at (732) 474-1748 to book a consultation within 24 hours and keep your system running at its best.