Many Americans are choosing to install panels and tap clean energy at the rooftop level. Lakisha Harris moved into a solar-equipped residence in Accokeek, Maryland in 2021 and quickly saw lower bills and a new appreciation for DIY projects.
This short guide walks you through the basic process of building an energy system that can save money on monthly utilities. It covers options, costs, and the installation steps a motivated homeowner can manage.
Whether you are a beginner or have hands-on experience, this guide aims to make the project clear and doable. You will learn practical tips for mounting panels, sizing the system, and avoiding common pitfalls.
By the end, you should feel ready to weigh options and plan an affordable system that brings steady power and long-term savings to your home.
Understanding the Benefits of Solar Energy
Switching some of your household electricity to sunlight can cut bills and boost energy independence.
The U.S. Department of Energy’s SETO has pushed affordability since 2008. That effort helped lower barriers and give buyers more choices for clean power.
Picking a diy approach often trims total project cost by avoiding a professional installer. It is one practical way to reduce upfront expenses while learning valuable skills.
Over time, solar energy systems can shrink monthly energy costs and shield you from rising utility rates. They also supply reliable power during daylight hours and can be paired with batteries for backup.
- Lower ongoing utility bills
- Greater independence from the grid
- Cleaner air through reduced fossil fuel use
| Benefit | Short Term | Long Term |
|---|---|---|
| Cost Reduction | Lower upfront with diy choices | Reduced monthly energy costs |
| Energy Security | Daytime power supply | Backup options with batteries |
| Environmental Impact | Cut local emissions | Support clean energy growth |
Understanding these advantages is the first step in deciding if this way of powering your home fits your goals.
Essential Components for Your Solar Power System
Before you start assembly, identify the key parts that make a reliable rooftop energy system. A clear parts list helps with budgeting, ordering, and a smoother install.
Solar Panels and Charge Controllers
High-quality solar panels convert sunlight into usable electricity. Pick panels with good efficiency and a solid warranty.
A charge controller protects the battery by regulating voltage and current during charging. It prevents overcharge and extends battery life.
Wiring and Tools
Proper wiring keeps the system safe and reliable. Use the correct gauge, MC4 connectors, and weatherproof junctions.
You’ll need basic tools like wire strippers, crimpers, a multimeter, and a torque wrench. These items help ensure clean, code-compliant connections.
- Inverter: Converts direct current into alternating current for household loads.
- Battery: Stores energy for use after daylight ends or during outages.
- Mounting hardware: Rails, brackets, and fasteners rated for your roof type.
| Component | Purpose | Example Brand |
|---|---|---|
| Panels | Generate electricity | Q CELLS, LG |
| Charge controller | Regulates battery charge | Victron, Renogy |
| Inverter | DC → AC conversion | SolarEdge, SMA |
Gather these components before you begin. That step saves time and reduces common mistakes during installation.
How to Make Solar Panel for Home Projects
Measure roof area and local sunlight before ordering any equipment. A quick site survey reveals how many panels you need and the best placement for peak power.
Select panels that fit your mount type. EcoFlow 400W Rigid Solar Panels work well for fixed rooftop installs, while portable units suit ground or temporary setups.
Consider shading, roof angle, and average sunlight in your area. These factors determine system output and affect overall cost and sizing.
Plan wiring, charge controller, and inverter choices in advance. That planning saves time on installation and reduces surprises during the build.
- Draft a parts list including panels, controller, inverter, batteries, and mounts.
- Estimate usable sunlight and expected electricity generation.
- Budget for permits and safety gear; this lowers long-term costs and risk.
With clear steps and the right equipment, this diy project is a cost-effective way to gain experience and cut utility bills.
Calculating Your Energy Consumption Needs
A simple energy audit reveals how many panels and battery capacity you will need. Start by listing every appliance and its watt rating. Then note how many hours each runs per day.
Assessing Your Daily Wattage
Multiply each device’s watts by daily hours to get watt-hours. Add those totals to find your daily energy need. This figure helps size a reliable system and estimate battery capacity.
Remember that real systems lose some efficiency. Factor in cloudy days and inverter losses so your design covers low-sunlight periods.
- Position panels at 15–40 degrees facing south in the U.S. for best energy capture.
- Keep a grid connection if you want backup from your utility during shortages.
- Use this daily wattage to choose panel count, battery capacity, and inverter power.
Tip: For diy installation, round up your estimates. A slightly larger system avoids surprises and keeps your roof-ready setup reliable.
Selecting the Right Battery and Inverter
Choosing the right battery and inverter shapes how reliably your system supplies power each day.
Selecting a deep-cycle LiFePO4 battery is a smart choice. These lithium-ion packs handle partial and deep discharges well. They last longer and need less maintenance than lead-acid options.
Deep Cycle Battery Options
Pick a battery sized for your daily energy needs and desired backup time. LiFePO4 units offer high cycle life and steady voltage under load.
- Capacity: Match amp-hours to your expected daily draw.
- Depth of discharge: LiFePO4 tolerates deeper use without quick wear.
- Safety: Built-in BMS protects against overcharge and short circuits.
Pure Sine Wave Inverters
An inverter converts direct current from panels and batteries into alternating current for household devices.
Choose a pure sine wave inverter to run sensitive electronics safely and with higher efficiency. During installation you’ll need to set and calibrate the charge controller so the battery charges correctly and avoids overcharging.
| Component | Recommended Type | Why it matters |
|---|---|---|
| Battery | LiFePO4 deep-cycle | Long life, stable voltage, safe under deep discharge |
| Inverter | Pure sine wave, correctly sized | Clean AC output for appliances and electronics |
| Charge Controller | MPPT with programmable settings | Maximizes harvest and protects battery health |
Use quality components and match ratings across battery, inverter, and controller. That builds a robust energy system that keeps you powered whether you stay tied to the grid or run off-grid.
For deeper inverter selection guidance, see this inverter guide.
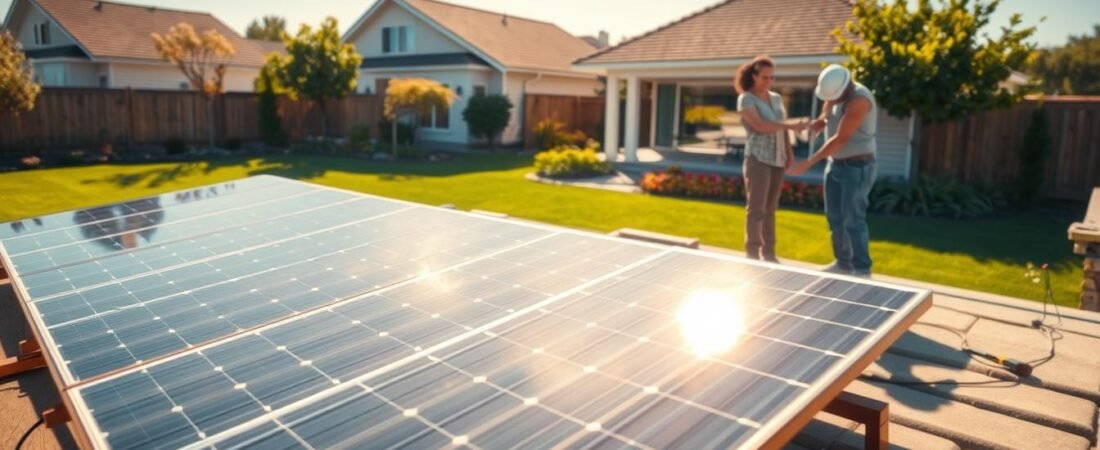
Mounting and Wiring Your Solar Array
A proper mount and clean wiring let your array harvest maximum sun and last for years.
Mounting: Secure panels to the rooftop or a ground stand using rails and certified anchors. Check roof type and local code before drilling. Use flashings and sealants rated for roofing applications so you avoid leaks.
Wiring basics: Run positive and negative leads using the correct gauge for your system current. Keep cable runs short when possible and protect wires with conduit where they cross the roof edge.
Connect safely: Cover live modules with a dark cloth while making final connections to prevent unexpected feed. Use MC4 connectors for weather‑resistant, locking hookups that last in any area.
“Proper connections and solid mounts reduce maintenance and keep energy flowing reliably.”
- Confirm fuse and breaker sizes match inverter and battery ratings.
- Label runs and document cable routing for future service.
- Test voltage at the charge controller before finalizing the install.
| Task | Best Practice | Why it matters |
|---|---|---|
| Mounting hardware | Use stainless steel rails and flashing | Prevents corrosion and roof leaks |
| Wiring gauge | Choose AWG per current and distance | Minimizes voltage drop and heat |
| Connections | MC4 with proper crimping | Weatherproof and secure long term |
Final step: Once the components are connected and tested, the system will begin producing electricity, letting you harness sun power for your home.
Weighing the Pros and Cons of DIY Installation
Before climbing on the roof, weigh the benefits and risks of handling an installation yourself.
Pros: A DIY route can cut price and give valuable experience with system components. You learn about wiring, battery management, and the charge controller that keeps a pack healthy.
Cons: Working with electricity and heights raises real safety concerns. Some parts may lose manufacturer warranty if not installed by a certified installer.
Safety Precautions and Risks
Take simple steps: use fall protection, shut off circuits, and follow local code. If wiring seems complex, call a pro.
“If the process feels beyond your skills, hiring an installer protects your roof and your warranty.”
- DIY saves money but may shift liability and utility paperwork to you.
- PROINSO’s network lists over 2,500 certified installers for complex work or inspections.
- A clear plan and realistic time estimate reduce surprises and extra costs.
| Consideration | DIY | Professional |
|---|---|---|
| Cost | Lower upfront | Higher upfront, less risk |
| Warranty | Possible voids | Manufacturer coverage |
| Safety | User dependent | Certified procedures |
| Experience | Hands-on learning | Limited personal skill gain |
Final Thoughts on Your Solar Journey
A finished system rewards effort with lower bills and greater control over household power. This brief guide aims to help you plan, choose quality solar panels, and complete a safe DIY installation with confidence.
Your experience during the project will help with routine maintenance and future upgrades. A clear, strong, plan and careful wiring let panels perform well over time and cut long-term costs.
If the work feels big, hiring an experienced installer is a solid option. Whether you finish this project yourself or with help, you stand to save money and gain lasting energy independence.