This short guide walks you through planning, mounting, and connecting a sun charger to a compatible battery-powered device for a cleaner, lower-maintenance setup.
Simple expectations: the board helps keep the battery charged longer but does not replace the battery. Your device still needs its battery to run.
Before you drill, pick a spot with several hours of direct sun, choose the right tilt, and plan a neat cable route for a professional look. Check connector type—USB‑C or barrel—so the cord fits your unit.
Steps here apply across battery models including spotlight-style units, but always confirm details in your model’s manual. Use the proper tools for the mounting surface and be mindful of what’s behind walls when you drill.
Before You Begin: Compatibility, Battery, and Manual Check
First, confirm your exact device model and the type of cable it needs for power. This quick check saves time and prevents mismatched parts that stop progress before you start.
Some chargers end in USB‑C while others use a barrel plug. Adapters (USB‑C↔barrel) exist, but it’s best to confirm the socket on your unit first.
- Confirm model support: Ensure your unit explicitly supports external charging so you don’t waste time on the wrong accessory.
- Connector match: Verify cable type and have an adapter ready if needed.
- Pre-charge the battery: Fully charge and insert the battery before mounting so you can test Live View and motion settings right away.
- Charging cues: For Spotlight Battery, red+green lights show charging; green only means full.
- Battery care: Expect the system to limit charge near ~80% to extend battery life.
Note: The charger maintains charge; it does not run the unit without a battery installed.
Confirm your device and connector type
Check the exact model name and the socket shape before buying or mounting any hardware.
Verify battery requirements and pre-charge
Charge the battery to full, install it, and confirm status lights so testing is smooth after mounting.
Find and download the user manual
View or download the correct user manual from the official installation guide library to match screw locations and seals to your model.
Choosing the Best Location for Direct Sunlight and Reliable Security Coverage
Find a place on your property that sees steady sun most days; that choice affects both charging and detection.
Meet the minimum sunlight requirement: Aim for a location that reliably gets 4–6 hours of unobstructed direct sunlight most days. This helps maintain charge without replacing the battery.
Check for shade: Scan for trees, rooflines, gutters, porches, or fences that cast long shadows in the morning or late afternoon. Shadows that only touch the spot briefly can still reduce daily output.
Plan for seasonality and latitude. What works in summer may underperform in winter. Pick a site that stays sunny as the sun’s angle shifts through the year.
- Hemisphere aiming: In the Northern Hemisphere face the unit south; in the Southern Hemisphere face it north.
- Security outcomes: Place the device so it watches priority approaches—driveway, front walk, or side gate—without constant false alerts.
- Motion basics: For best human detection, mount about 8–10 ft high with the motion sensor parallel to the ground.
- Mounting considerations: Choose a solid surface for the mounting plate or bracket and plan a tidy, protected cable run.
Tip: Do a quick Live View test by temporarily holding the unit in place to confirm sightlines before you drill.
For detailed mounting notes and compatibility, see the official guide.
Tools and Hardware You’ll Need for a Clean Install
Gather the right hardware and a small toolkit before you start so the job goes quickly and stays tidy.
What to confirm in the box:
- solar charger, mounting arm or bracket, mounting screws, and mounting anchors
- cable clips or cable stops if included for neat routing
Core toolkit for most homeowners
Bring a Phillips-head screwdriver, a drill with a 6 mm (1/4″) drill bit, and a pencil for marking. These cover most jobs and keep you efficient.
Surface-specific prep
Wood and vinyl usually accept the included screws directly. No anchors needed on solid wood studs or firm siding.
For brick, concrete, and stucco, drill 6 mm holes first. Insert plastic anchors and tap them gently with a hammer so the bracket sits flush.
Why surface prep matters: The right fasteners prevent loosened mounts from vibration, wind, or temperature shifts. Plan cable routing now to avoid exposed loops and drip paths later.
Safety reminder: Avoid drilling where wiring may run and use only the included mounting screws for the device bracket.
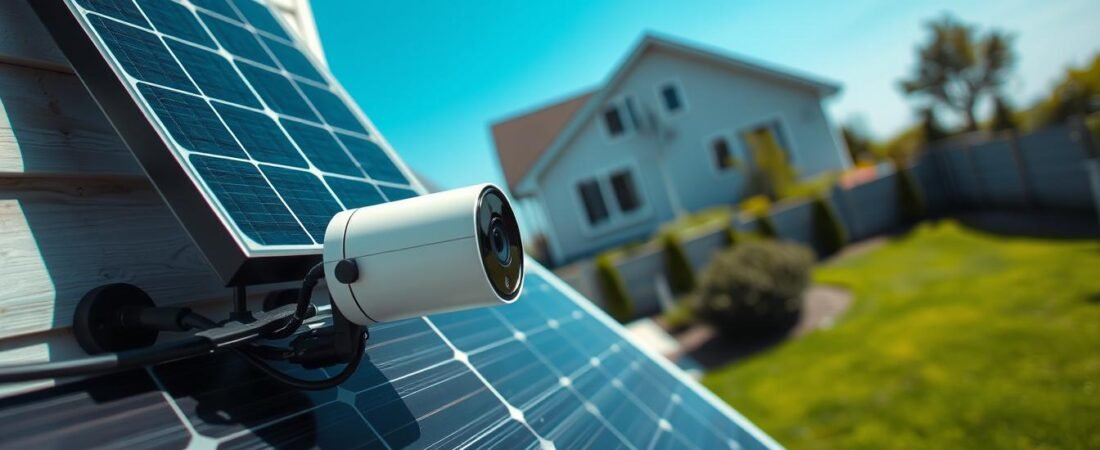
ring camera solar panel installation Steps for Mounting the Panel
Start the mount by holding the bracket where it will sit, level it by eye, and mark each screw hole with a pencil.
Mark and prepare the holes
Use the mounting arm as a template and transfer hole positions to the wall. For wood or vinyl, a small pilot hole can help guide the screw and reduce splitting.
Masonry prep
For brick, concrete, or stucco, drill the marked holes with a 6 mm (1/4″) bit. Insert wall anchors fully and tap them gently with a hammer if needed.
Fasten the bracket and attach the panel
Fasten the mounting arm with the included screws. Tighten until snug so the bracket does not wobble, but avoid over-tightening that can strip anchors or crack stucco.
Slide the solar panel onto the mounting arm and tug lightly to confirm it is locked and secure before proceeding to cable routing.
Set the tilt
Loosen the adjustment screw or nut, set the tilt to roughly a 45-degree angle toward the sun, then re-tighten. Do a quick Live View check and scan for new shade from gutters or trim.
Quick tip: If shade appears after angling, adjust the mount slightly before final tightening to maximize daily output.
Connect the Solar Cable to Your Ring Camera and Secure Everything
Now that the bracket is set, attach the cable to the device and secure every connection so moisture and movement can’t cause trouble.
Remove weather seals: If your model has a rear weatherproofing plug or seal over the power socket, remove it carefully. Take out any small screws first so the connector can seat fully without damage.
Plug in and secure the connector
Insert the cable into the socket firmly until it clicks. If the connector does not match, use the correct adapter—do not force a mismatch.
Barrel-plug note: Some barrel plugs have screw tabs. Use only the included short screws to lock them in place outdoors.
Tidy the run and lock the angle
Route the cable along trim or the mounting plate edge. Leave a gentle drip loop and fasten the run with cable clips or stops so it won’t flap in wind.
- Wrap extra cable on any provided holder and clip into a cable stop.
- Attach the spotlight cam to the mounting bracket by pushing the ball joint into the socket until it snaps.
- Adjust view with Live View, then tighten the metal collar and the security screw to prevent drift.
Tip: Mount around 8–10 ft for best motion detection and consult your user manual for seal locations, mounting plate orientation, and exact screw placement.
For full details, refer to the official guide.
Conclusion
Conclusion — quick guide wrap-up.
Finish smart: confirm compatibility and connector type, fully charge and insert the battery, then choose a sunny spot that still provides strong coverage.
Remember: consistent direct sunlight (aim for 4–6 hours) is the single most important factor for reliable charging over time.
Use the bracket as a template, pick anchors that match your surface, and set the tilt so the panel faces the sun more often.
Tidy the final run: secure cables, tighten screws, and leave a drip loop to reduce weather wear and accidental unplugging.
Do a final app check with Live View and motion tests to confirm the field of view covers the priority areas for home security.
Keep maintenance simple: wipe debris occasionally and re-check angle and fasteners after storms or seasonal change to sustain performance.